Discover Cartagena, Colombia’s gem through real moments, beautiful places, and unforgettable food
Looking for a trip that has it all?
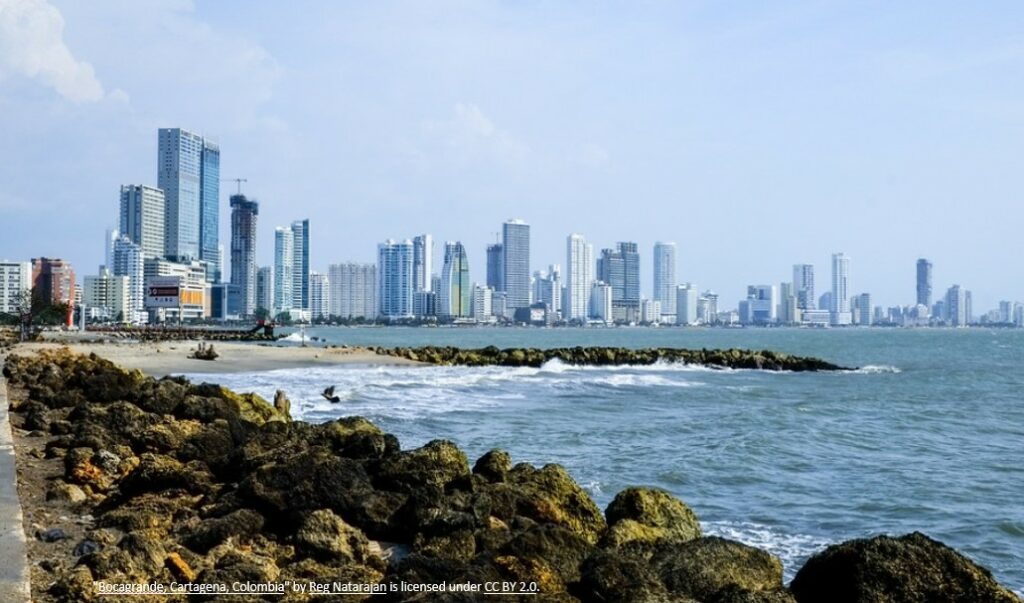
Walled city and Bocagrande neighborhood
Planning a trip can be a big challenge, especially when you want a little of everything. Cartagena, Colombia offers both. This Caribbean city is full of life, charm and history. This city welcomes you whether you want to relax, explore or create unforgettable memories. In this blog, I’ll share what I did, what I ate, and why Cartagena should be on your travel list.
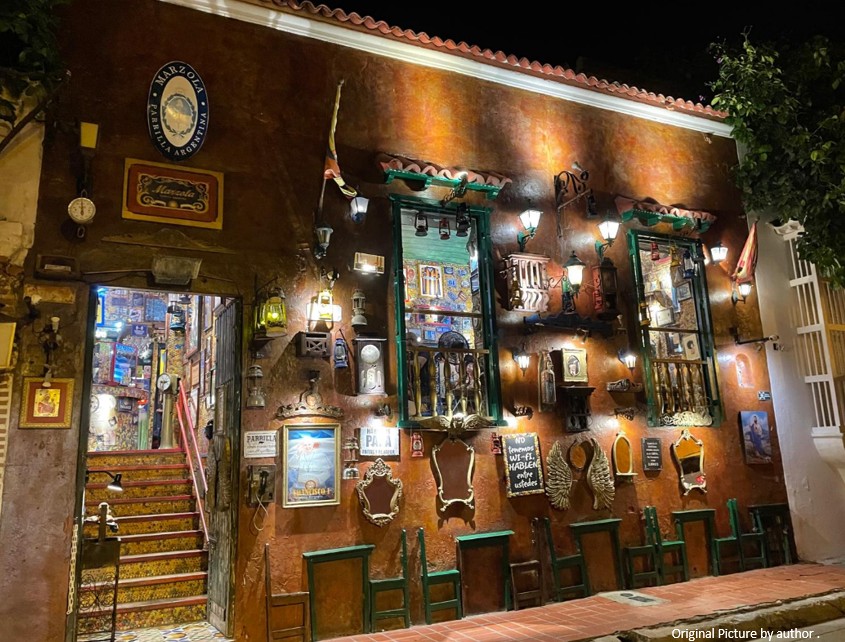
Explore the Walled City (Ciudad Amurallada) and Getsemaní
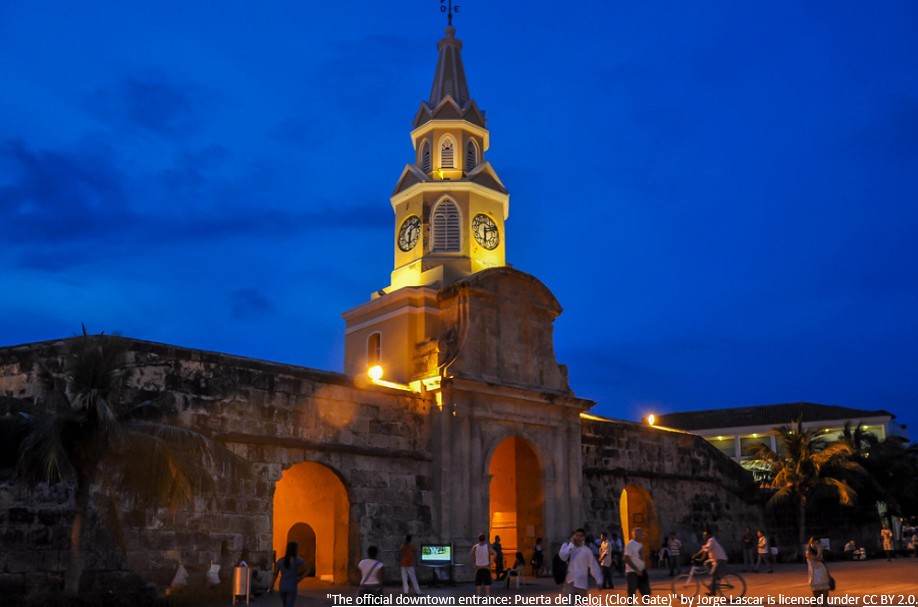
Walled City Cartagena Torre del reloj
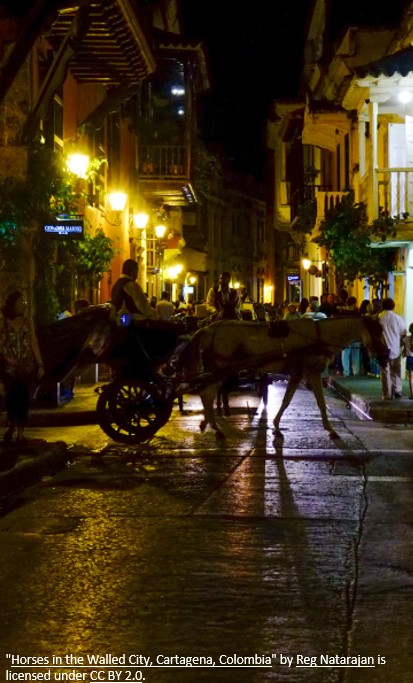
The Walled City (Ciudad Amurallada) is the historic heart of the city, it’s a Magical place like the ones Gabriel Garcia Marquez described in his books. Next to it is Getsemani, a more relaxed and artistic neighborhood. In the walled city, I walked an entire day throughout the narrow, charming streets. Admiring the murals, paint walls, colonial style balconies with flowers, live music, street food and handmade crafts. I felt like walking in Disney’s Encanto Movie, just magical. Getsemani is more relaxed and budget friendly. I describe it as more boho-chic vibe. Full of hostels, cafés and cozy boutiques hotels.
Why will you love it?
A place full of history, color and Caribbean vibes
Easy to walk and explore with friendly, warm people
Unique shops, cafes and streets.
Tip: When walking through these places, use light clothes and comfortable shoes. The streets are made of cobblestones and usually the days are sunny, hot and humid.
Visit Castillo San Felipe de Barajas
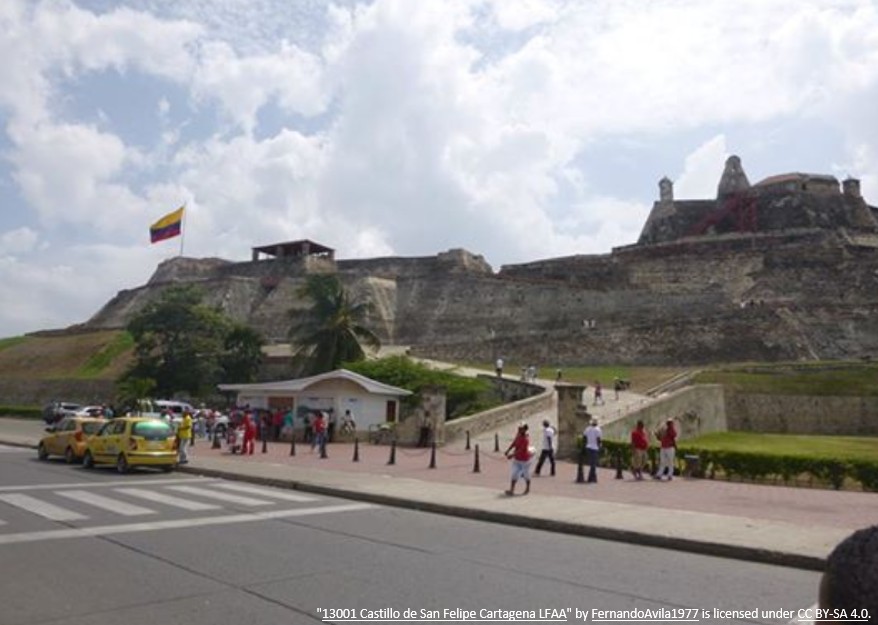
Castillo de San Felipe
This castle is one of the most famous landmarks in Cartagena. It was built to protect the city and now it’s a tourist place that offers amazing views and history. I explored tunnels, climbed the towers, and looked out over the city from above. It’s a great spot to learn, move, and take amazing photos.
What to expect there?
Tunnels, cannons, and panoramic views
A fun mix of history and adventure
Tip: Visit early in the morning with water, sunscreen, and a hat to avoid the heat.
Enjoy Food Full of Caribbean Flavor
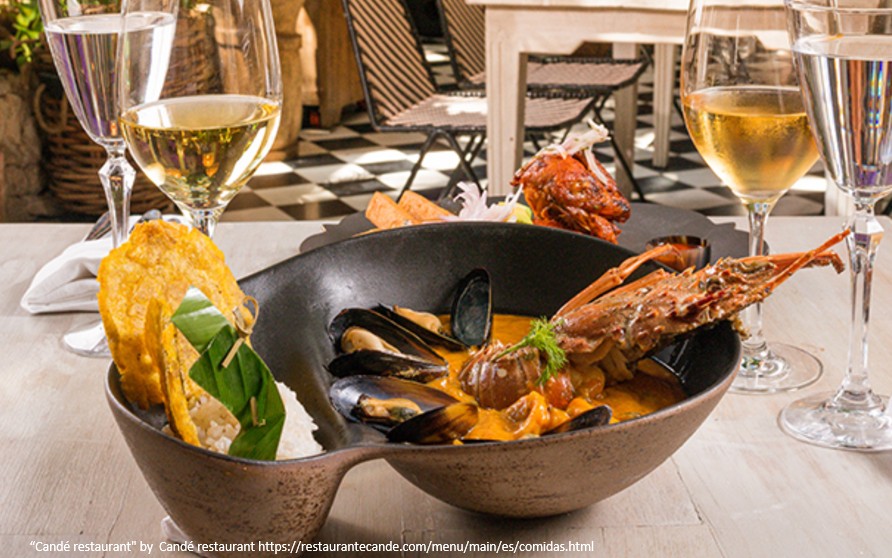
Candé restaurant
As a Caribbean city, Cartagena’s food is full of flavours, color and traditions. From street snacks to elegant meals, every bite was unforgettable. Here are my recommendations:
Top restaurants:
Candé – Caribbean dishes with live music and a lovely setting
Tip: These places get busy, so try to book a table in advance, especially for dinner.
Start Your Day Jogging in Bocagrande
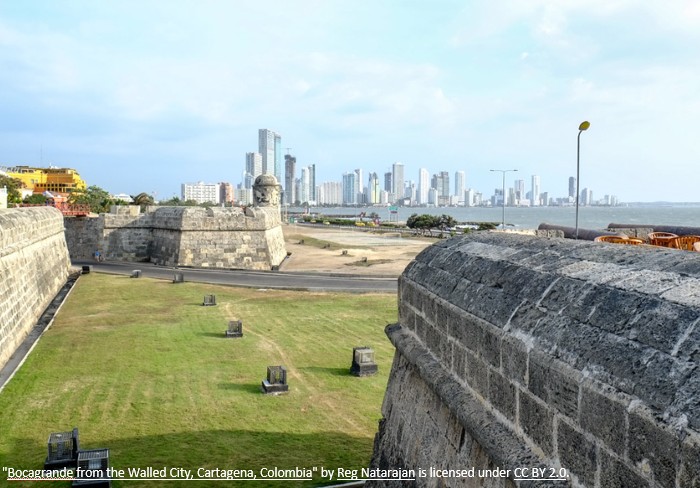
Bocagrande
For those who enjoy exercise, jogging along the Bocagrande pier is a must. Bocagrande is Cartagena’s modern seaside neighborhood and jogging there early in the morning, feeling the ocean breeze, watching the sunrise and enjoying the calm atmosphere was peaceful and refreshing.
Why you’ll love it?
Safe and relaxed early in the morning
Ocean views and fresh air
Time to reset your mind and body
Tip: Wake up early and jog before 9 am to avoid the hot weather.
A One-Day getway to Barú island
Playa Blanca, Barú
To see clear, blue water and golden sand, you need to leave Cartagena’s main coast. I took a boat to Islas del Rosario and spent the day on Barú Island. The beach was beautiful, the water was warm, and the seafood was fresh and local. I swam, relaxed, and sipped coconut water under the sun.
Why it’s worth the trip:
Calm, quiet beaches with crystal water
Fresh seafood and tropical vibes
You can visit on a simple day tour
Tip: Bring your own towel, sunscreen, and cash. Ask for prices before buying anything to avoid overpaying.
Cartagena a magical Caribbean city
Walled city, Cartagena
This trip gave me space to rest, explore, and reconnect—with the city, with others, and with myself. It’s a magical place whether you are travelling alone or with family or friends. The city it’s alive and has its own soul. The architecture is stunning and breathtaking, people are so warm and there are so many activities to do. This place will stay with you long after you leave.
Are you ready to start planning your next trip?
If you want more tips or want to share you experience leave a comment below. Or subscribe here to get my latest destinations tips and personal travel stories, and simple planning checklists. Let’s keep discovering one beautiful place at a time.
Discover why Lisbon is one of the best destinations in Europe for solo female travelers
Planning a Solo Trip? Start Here
If you’re dreaming of your next solo adventure but feel overwhelmed by too many options, you’re not alone. Planning where to go can be exciting—but also confusing. You want more than just tourist spots. You want authentic experiences, safe streets, affordable food, and a city that feels warm and creative. If that sounds like you, Lisbon, Portugal is the place to start. This guide gives you everything you need to know to plan your solo travel in Lisbon—simple, inspiring, and stress-free.
Lisbon, Portugal
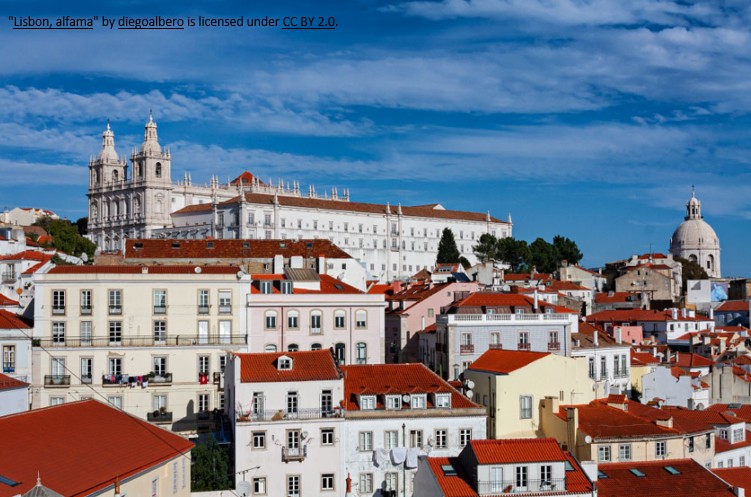
Where to Stay in Lisbon as a Solo Traveler: Choose Alfama
Lisbon, Alfama neighborhood
Choosing the right neighborhood can make a big difference. For first-time solo travelers, Alfama is the perfect place to stay. It’s Lisbon’s oldest district, full of charm, cobblestone streets, and colorful tiles.
Why Alfama is ideal:
Safe and walkable
Close to viewpoints, cafés, and tram stops
Peaceful, yet close to major attractions
Beautiful spots for photography and inspiration
Travel Tip: Book a small guesthouse or Airbnb with positive solo traveler reviews.
Top 5 Things to Do in Lisbon for Solo Travelers
Miradouro da Senhora do Monte, Lisbon
Feeling overwhelmed by long must-do lists? Start with these 5 locations that offer beauty, culture, and comfort—without stress.
Best things to do in Lisbon:
Miradouro da Senhora do Monte – Best place to watch the sunset
Time Out Market – Taste many Portuguese dishes in one spot
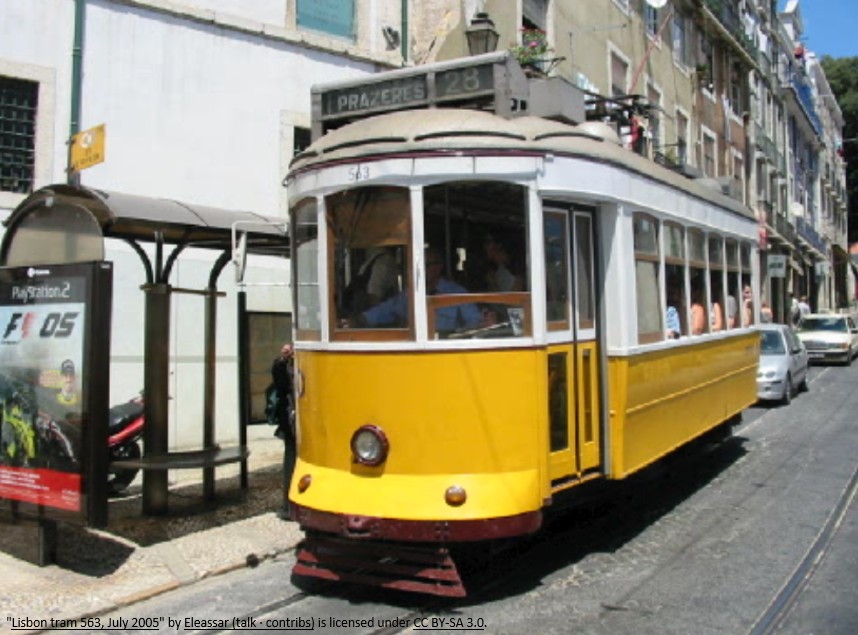
Ride Tram 28 – Classic Lisbon experience through historic neighborhoods
Explore LX Factory – A creative space with art, food, and shops
Wander Alfama – Get lost in narrow streets and discover hidden gems
Local Tip: Choose 3–5 must-sees and leave space in your schedule to wander.
What to Eat in Lisbon (Even When Dining Alone)
Pasteis de nata
You don’t need a group to enjoy Lisbon’s food. It’s easy to eat out alone here, and the food is both delicious and affordable.
Must-try local places:
O Trevo – Casual sandwich shop known for Bifana (pork sandwich)
Princesa do Castelo – Cozy vegetarian-friendly café
Pastéis de Belém – World-famous custard tarts, best eaten warm
Budget Tip: Look for small family-run “tascas” with handwritten menus—they serve real local food at great prices.
Getting Around Lisbon as a Solo Traveler
Lisbon tram
Lisbon is very walkable, and the public transport system is simple to use. You don’t need a car.
How to get around:
Walk to most places—wear good shoes for hills
Use Tram 28, metro, or buses
Download Citymapper or Google Maps for easy route planning
Smart Move: Buy a 24-hour transit pass if you plan to use public transport multiple times in a day.
Travel Photography in Lisbon: Where to Take the Best Photos
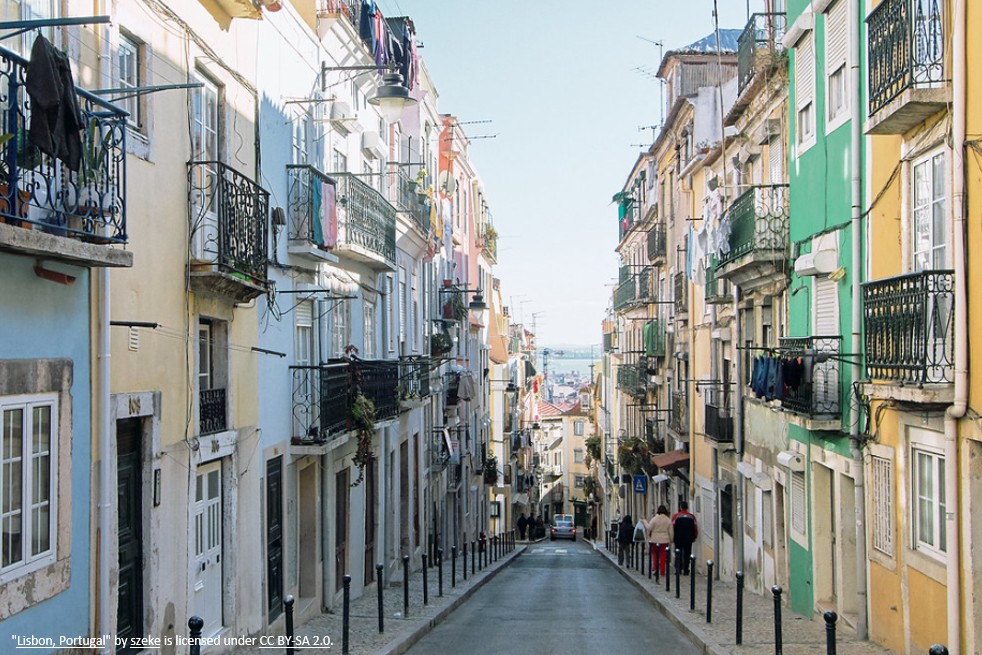
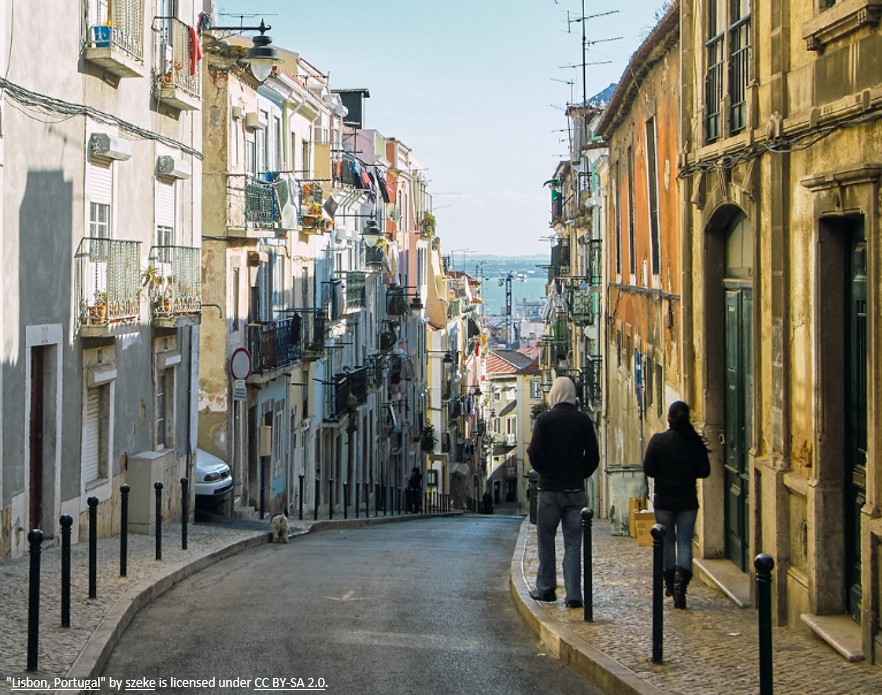
Lisbon streets
For travelers who love capturing beautiful moments, Lisbon is a dream. The colors, light, and street scenes are perfect for photos.
Best times and spots for solo travel photography:
Early morning – Quiet streets and soft light
Golden hour – Glowing rooftops and dreamy skies
After rain – Reflections on stone and tile
Photo Tip: Focus on emotion, not perfection. Your best photo might be a smile from a street musician or a quiet doorway.
How to Meet People (Without Feeling Awkward)
Lisbon, Portugal
Lisbon is friendly, laid-back, and easy for solo travelers to connect—if and when you want to.
Ways to meet others:
Join a free walking tour
Book a bed & breakfast with shared meals
Talk to shop owners, baristas, or locals in bookstores
Social Tip: You can always join a group—then leave when you’re ready to recharge alone. That’s the beauty of solo travel.
Lisbon Is the Perfect City for a First Solo Trip
Lisbon, Portugal
You don’t need a packed itinerary or perfect plan. You just need a city that welcomes you, lets you slow down, and shows you something beautiful every day. For creative, independent travelers like you, Lisbon is safe, inspiring, and easy to enjoy. Whether you’re wandering tiled streets or sitting at a rooftop café with your journal, Lisbon makes solo travel feel simple again.
Want Help Planning Your Lisbon Trip?
Download your free Solo Travel Lisbon Checklist – a simple one-page guide with local tips, top places to visit, best apps, and packing reminders.
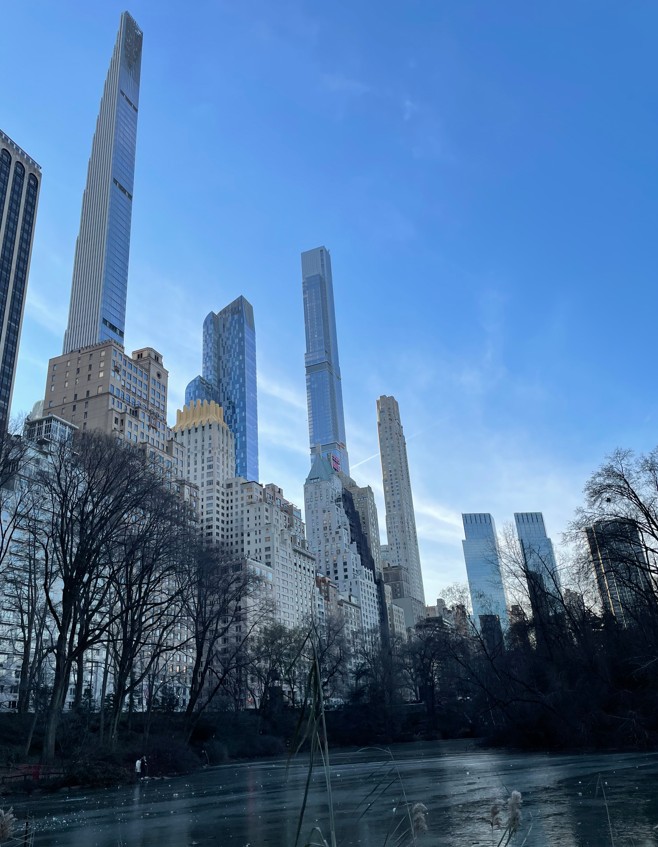
My Winter Getaway: Why You Should Visit New York City During the Christmas Season
New York City in Winter is just magical. I’ve visited several times before, but never during Christmas season. In this season the city transforms into a true NYC winter wonderland, just like a movie! Fromice skating at Bryant Park, to shopping in the charming Winter Village and walking through Central Park in winter, everything felt like an enchanting holiday movie. I planned this New York holiday tripbecause it’s my favorite city and to experience the best winter activities in NYC. Although it was a short trip, of only 4 days, it was packed with unforgettable sights and iconic New York attractions in December.
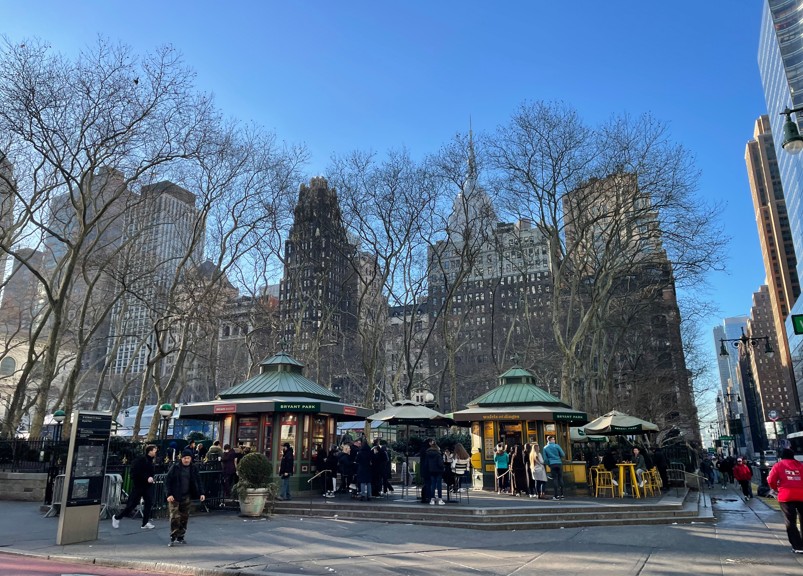
Skating and shopping at Bryant Park Winter Village. A true NYC Christmas tradition.
My goal was to skate at the Rockefeller Center, but it was too crowded, so I went to the Bryant Park Winter Village and it was a dream come true. The market is so warm, with a festive atmosphere surrounded by holiday markets, music and lights, it felt like being in a European small cozy town celebration.
Recreating that Home Alone 2 moment, in front of the Rockefeller tree. NYC is just like the movies!
Kevin in front of the iconic Rockefeller Center Christmas Tree In New York City in Home Alone 2 movie.
Watching the amazing Saks Fifth Avenue light show was breathtaking, and theMacy’s holiday windowsdecorations was better than what I expected. For me New Yorkers really live for the Christmas season!
Macy’s window displays light up the city with Christmas season holiday magic.
Holiday Treats and A Peaceful Winter in Central Park
A sweet treat was trying the famous Magnolia Bakery banana pudding for the first time. It was so creamy, and balanced in flavor, just unforgettable. Also, walking through Central Park, feeling a moment of peace surrounded by trees, warm sunlight in the middle of the city, was magical.
A peaceful winter walk through Central Park, right in the heart of New York City.
Trying for the first time the Magnolia’s famous banana pudding. A sweet holiday treat in NYC.
Although it was a bit cold, New York during the wintersparks with life. If you can visit it during the Christmas season and experience the magic of a true NYC winter getaway, I can assure you, you won’t regret it, and you will want to go back again.
A friendly beginner’s guide to change themes, structuring the content with HTML, using Custom CSS, and Installing Google Analytics
Are you looking for a beginner-friendly guide to personalize your WordPress Webpage? This post will show you step-by-step how to make basic changes in your WordPress website. Wether youa re just starting or want to explore more a basic technical side, this is the right place to start!
Here you will learn:
How to change a theme
Use simple HTML Tags
Add customs CSS
Connect your website to Google Analytics to track your visitors
Let’s start our journey!
1. Change the WordPresstheme on the website
Once you have set up your WordPress account and domain, you can start by personalizing your website by selecting a theme. But how do you do it?
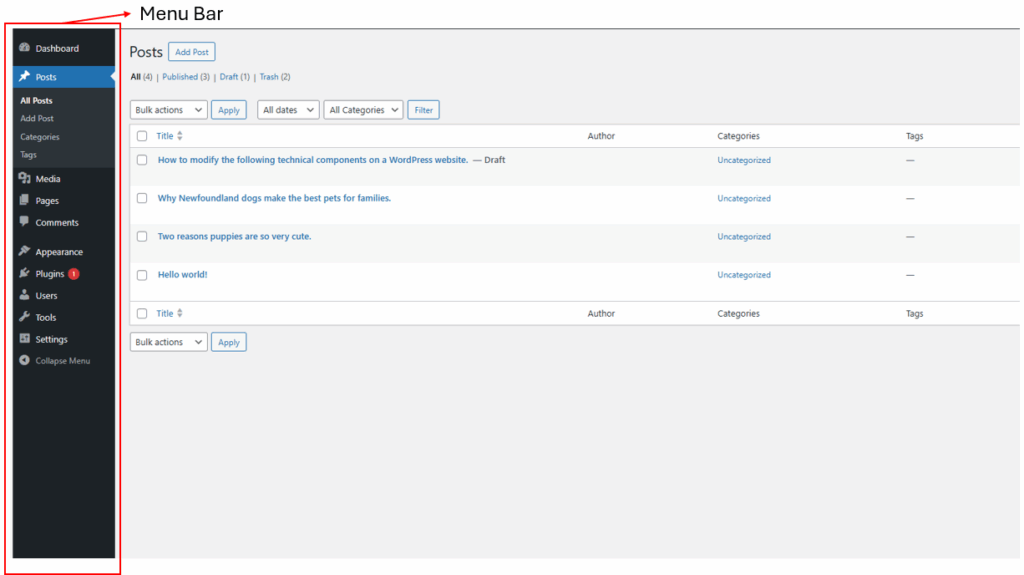
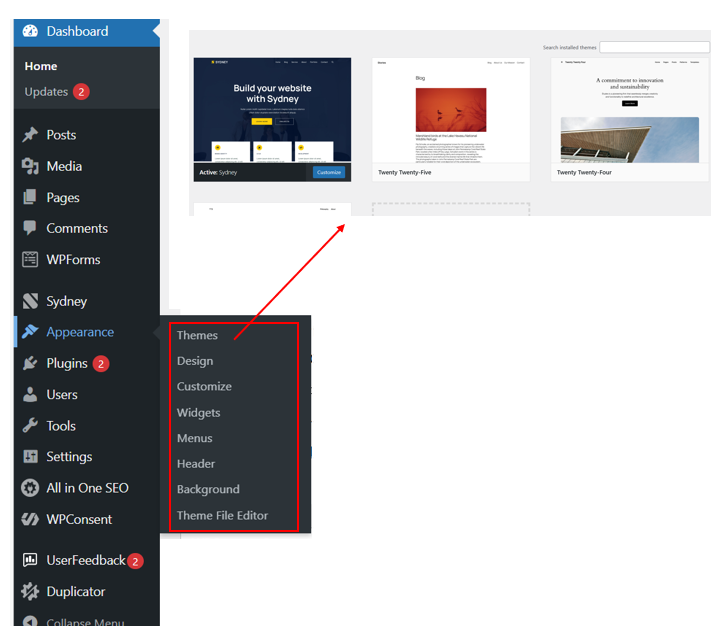
In the WordPress Dashboard, on the left side of the screen you’ll have the menu bar:
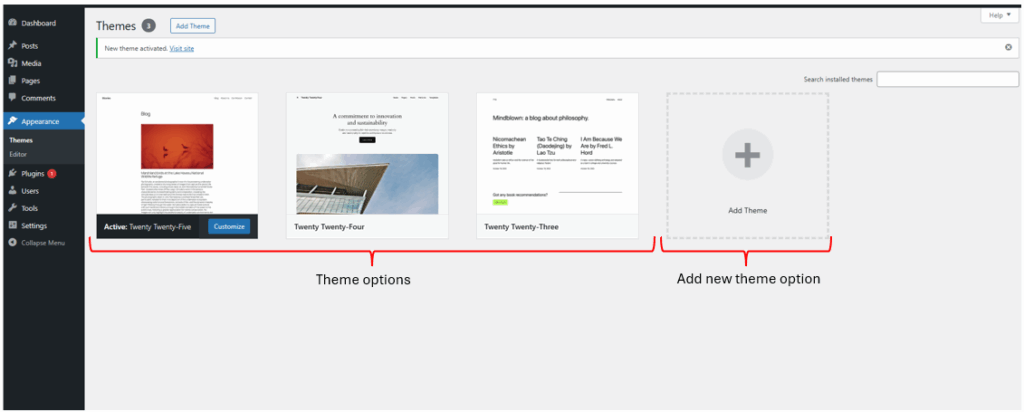
You should click on appearance and then Themes option, as shown in the following image:
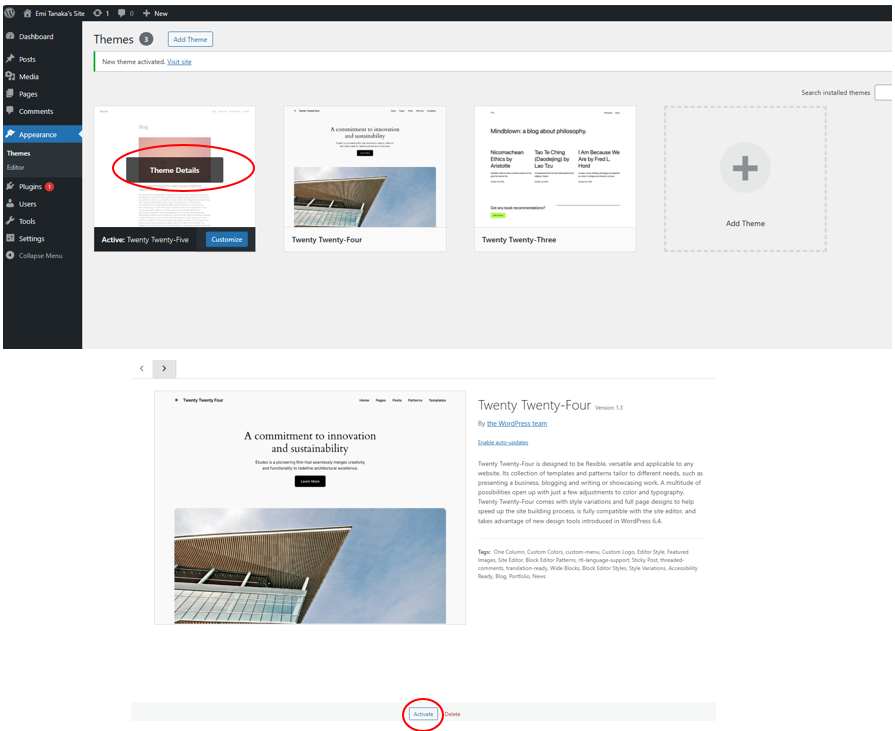
Once clicked, it will display the options you have for the themes, and you can select one. Also, if you have a theme already, you could upload it with the “Add Theme” button, there it will display a list of paid and unpaid themes you can choose from, or if you already have a theme, you can upload it in a .zip format.
If you want to review the detail of an theme you can just click on Theme Details. This will show you a preview of how the theme looks like and how it will look in your site. If you want to select that theme, just click on Activate button.
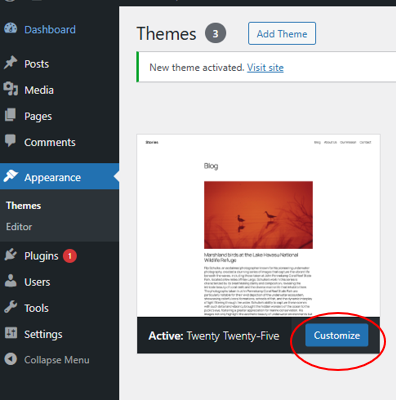
Finally, if you want to customize the theme, you just need to press the Customize button. This will allow you to start using the theme and edit it as you want.
If you go back to Appearance in the Dashboard, you will have all the options for start personalizing your website. And if you want to change of theme this is the right path, you just need to click the Theme button and again select the new theme you want to apply and follow the previous process again.
2. Use of HTML tags to define content on a blog post
HTML or Hypertext Markup Language is the language used to structured content on a website. Is like the instructions that the webpage follows to structure the webpage so it can know what the titles and subtitles are, the paragraph, list, etc. This language is made up of tags that are small pieces of code that help the browser understand the hierarchy and how to display the information.
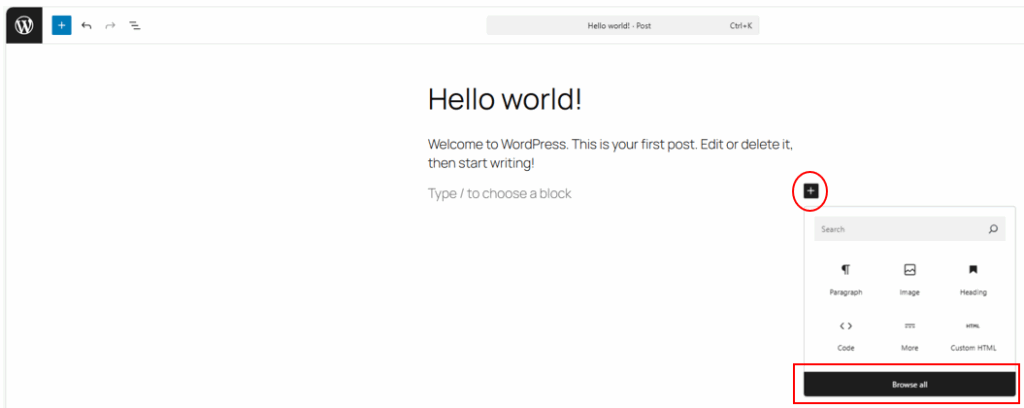
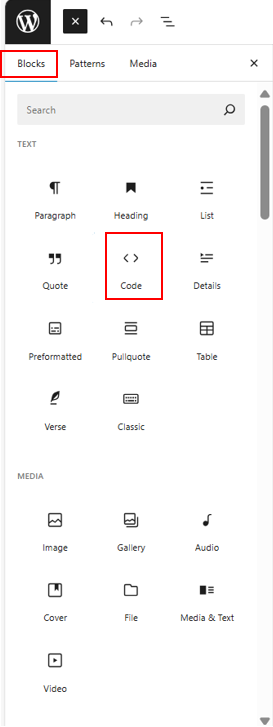
To insert a HTML Code, you should click in the + button that each block at the end have to add a new block. It will display a small window with options, and you should press Browse all.
Next, you should look for the option <> that is name Code in the “Blocks” menu
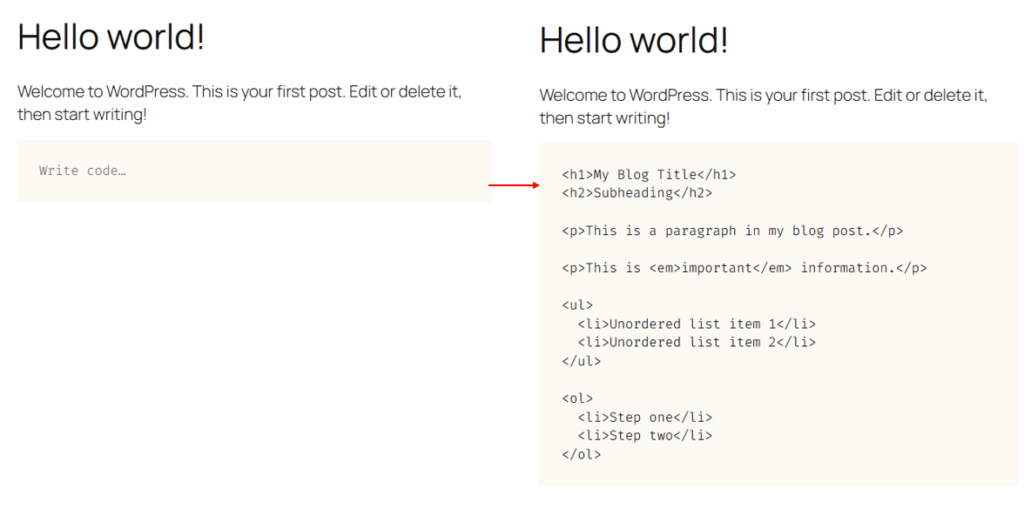
There, a Box will pop and there you can write the HTML code.
Breaking the code down in a code block:
This is the HTML code for heading. H1 refers to the main heading and h2 is a subheading.
<h1>My Blog Title</h1>
<h2>Subheading</h2>
For indicating the browser you are going to insert a paragraph, use the following tag <p>. The <em> means you are highlighting a word, and it will be in italic.
<p>This is a paragraph in my blog post.</p>
<p>This is <em>important</em> information.</p>
The following code is use for unordered list:
<ul>
  <li>Unordered list item 1</li>
  <li>Unordered list item 2</li>
</ul>
And for order lists (1,2,3,4…), we use the following code: <ol> <li>Step one</li> <li>Step two</li> </ol>
Please consider following main tags that serve as specific codes:
<h1> Use mostly for main titles <h2> or <h3> Subheadings or subtitles <p> For starting a paragraph that is composed by text <em> Gives content emphasis in italic style <ul> Is an unordered list (using bullets) <ol> Is an ordered list (using numbers) <Strong> Gives content emphasis in bold style
As an important note, the tags always come in pairs; The opening tag (Shown above) and the closing tag for letting the browser know when to stop a title to a bold letter or a paragraph, this tag include a forward slash \. For example, <p> is for starting a paragraph, when ending it the tag would be <\p>
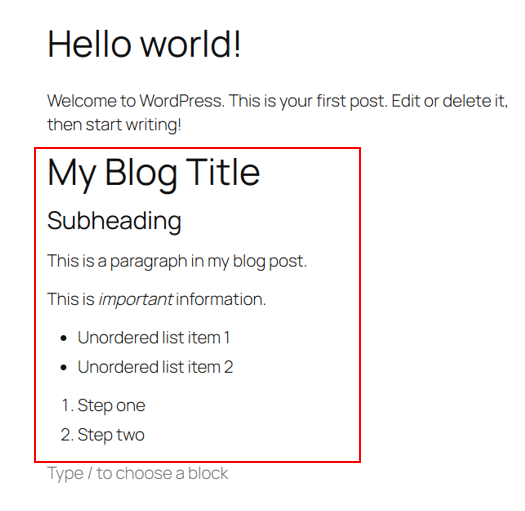
The previous HTML, could be translated to this:
3. Use of Custom CSS
CSS or Cascading Style Sheet is usually the type of language use to control the look, feel and layout of the content. This include but it’s not limited to: Colour, typeface, font size.
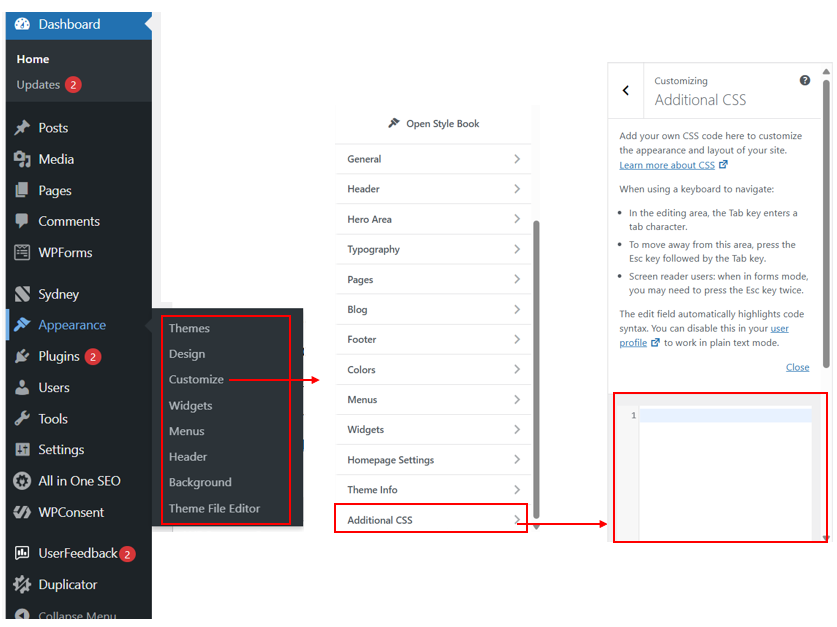
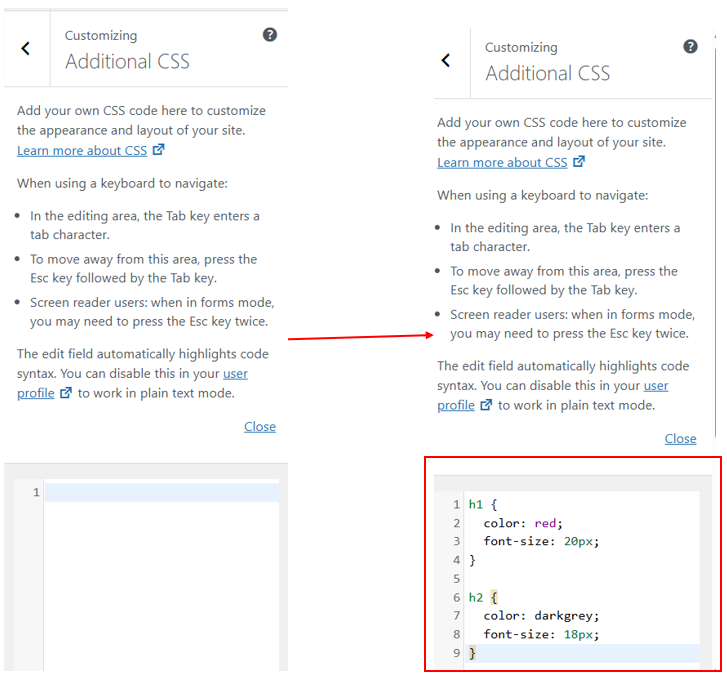
For adjusting this you should go to the dashboard, click on appearance option and then Customize>Additional CSS and that will show a Box where you can type.
That will open a box where you would have to input the instruction on what you need. Remember that CSS is for the Styles and appearance while HTML builds the structure.
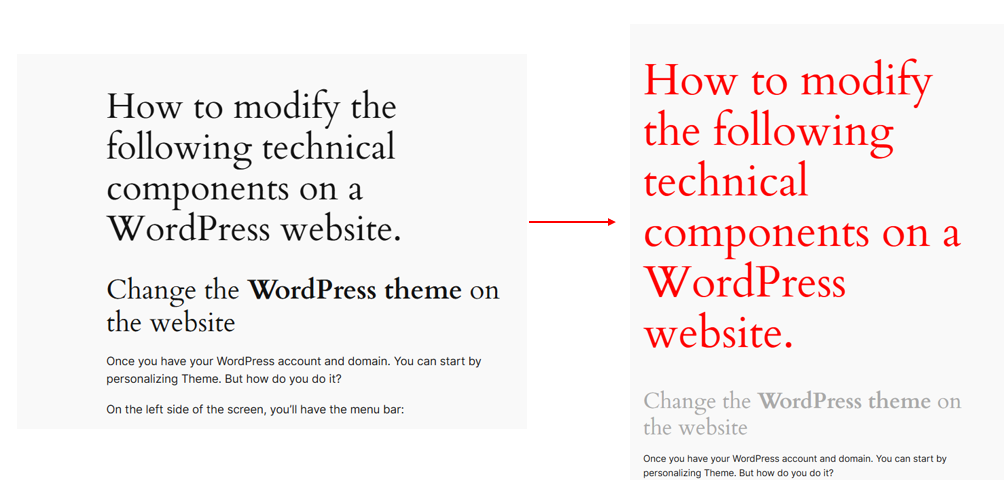
That instruction is what we ask the browser to change or website. The change is showed in the following image:
4. How to install Google Analyticsin WordPress
As a final part, Google Analytics can helps track how people use your website. You can check how many visits you have, the pages they view, many important metrics relevant to understand the performance of your webpage. This post will teach you how to install it using a plugin in WordPress called MonsterInsight that is friendly-user making the process very easy without the need of coding.
1. First you need to set up your Google Analytic Account.
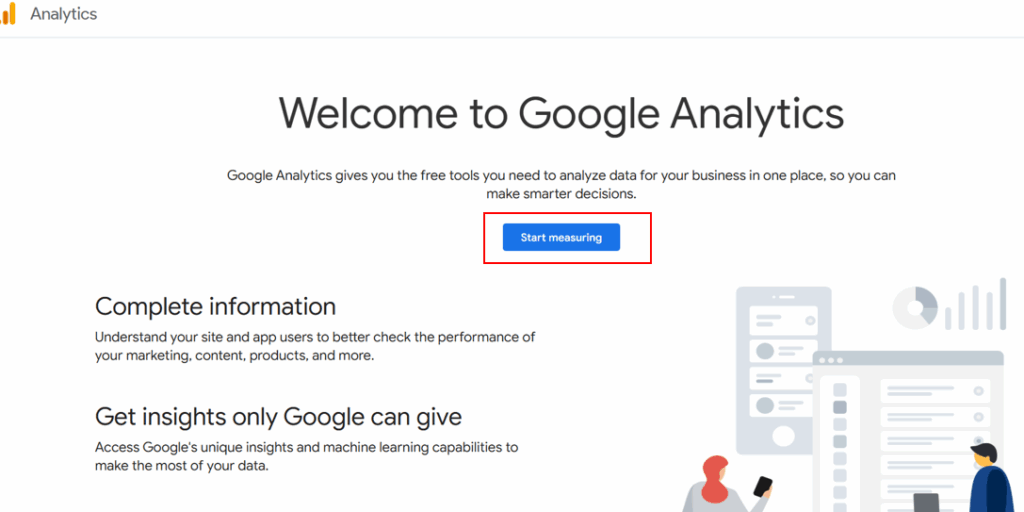
For starting, you got to the following link: Google Analytics | Google for Developers and log in with your Gmail account. In that home page you have to click the button Start Measuring.
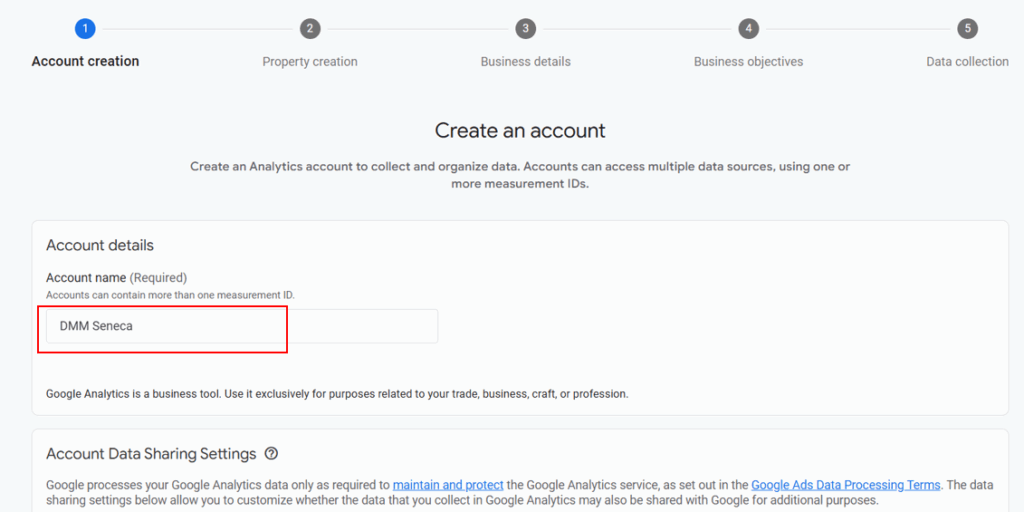
Then you will be asked to provide and account name. No worries, this is an internal name just for you, so you can use any name there.
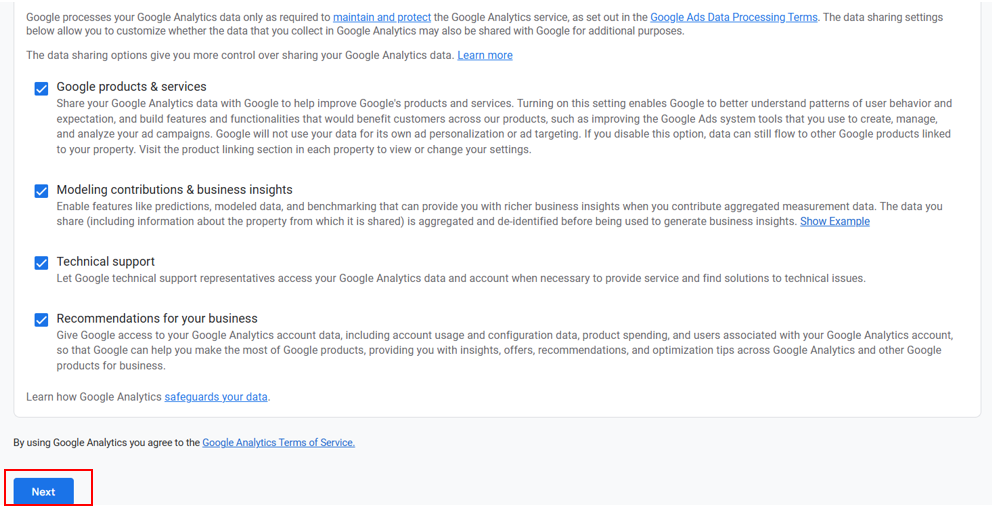
Scrolling down, you’ll be able to find the settings for giving control to Google Analytics Data. The most common option is to keep the default settings. After selecting, please press Next.
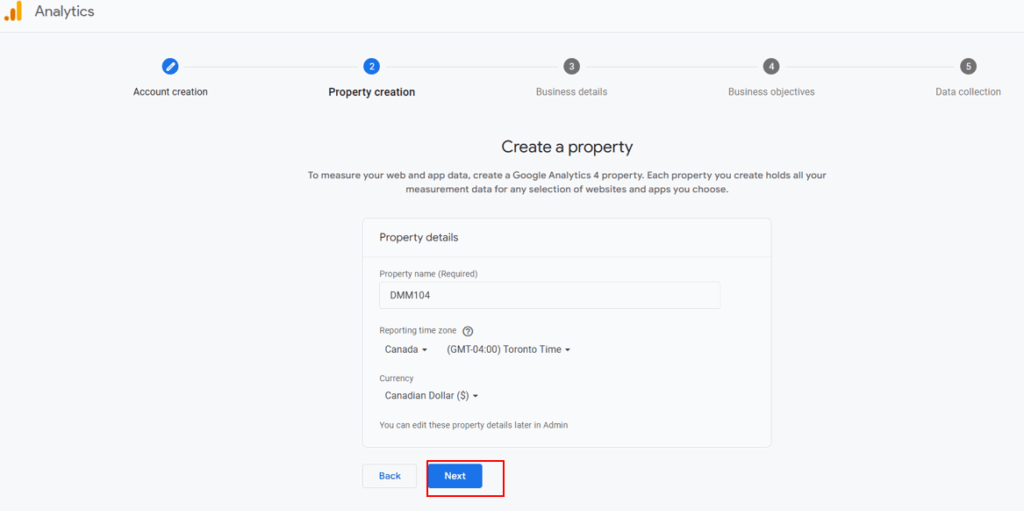
After this, you will need to create a property name and select the time zone, currency and country you are in. A property is the webpage you want to track.
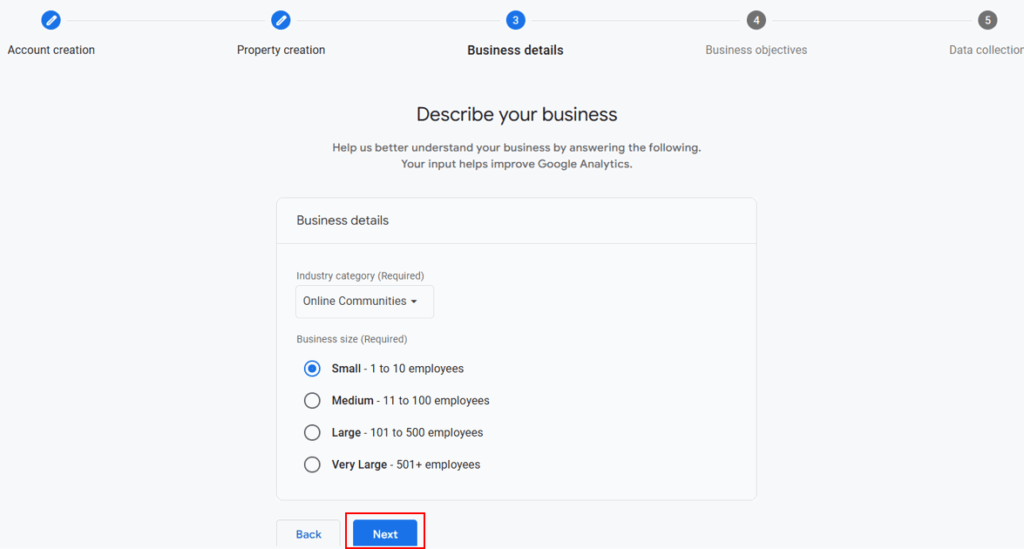
After clicking Next, Google will need you to describe your business. That mean selecting the industry your webpage belong to, and the size.
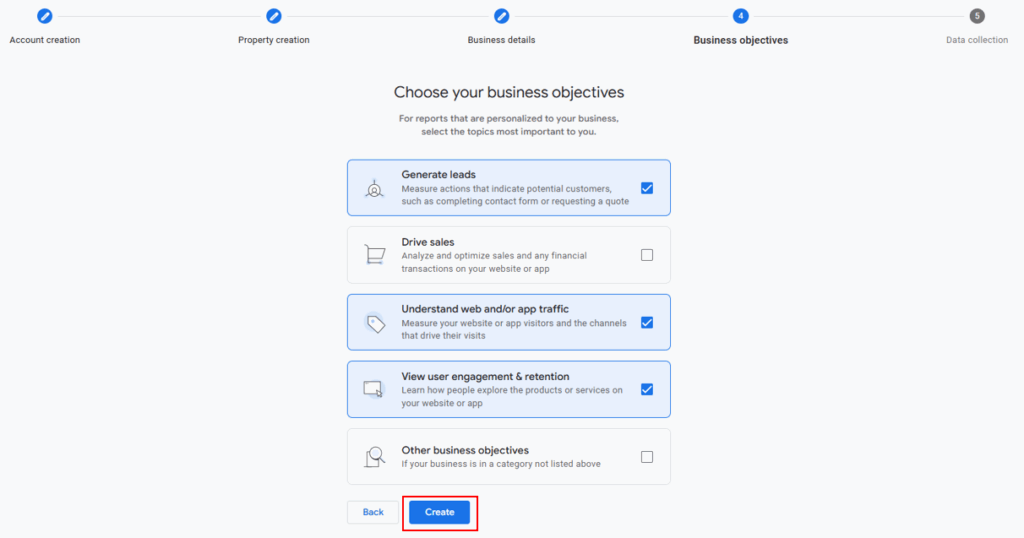
Followed by describing your business, you will need to select your business objective. This will allow to have more personalize reports based on your objectives.
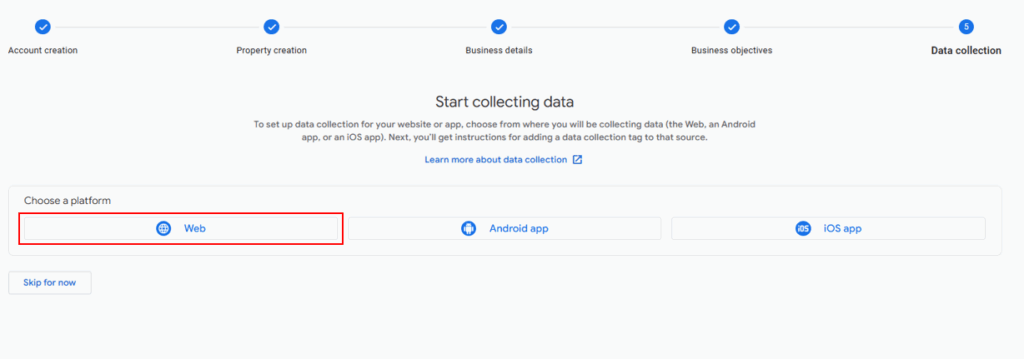
Later, Google Analytics will ask you to choose the platform form where you want to start collecting the data. In this case, WordPress that is a website.
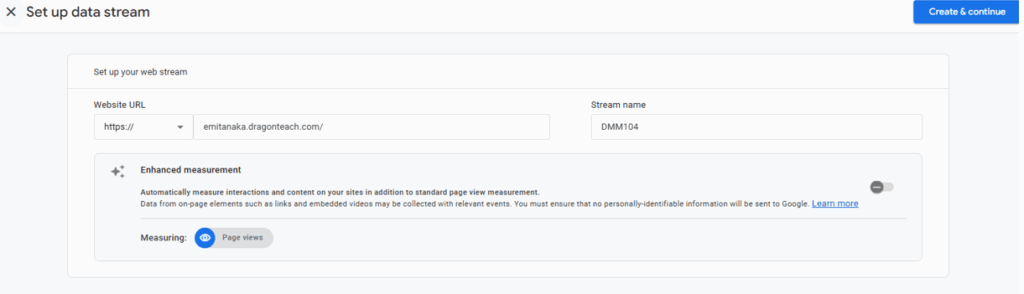
Then you will need to set up the stream data by adding the URL of the webpage and giving it a name. If you are planning to use the MonsterInsight plugin please turn off the enhanced measurement to have a more accurate data. For continue, please press Create & Continue button.
Once done this, you will need to set up the MonsterInsight plugin.
2. Setting up the MonsterInsight Plugin.
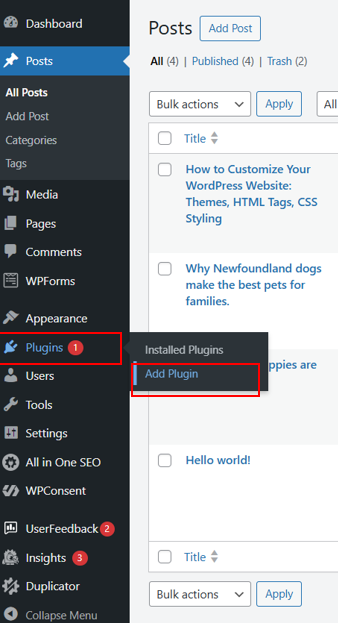
1. Add Plugins
The first step is to add the MonsterInsight plugin. You can do this by going to the WordPress menu and click on Plugins and add Plugins button.
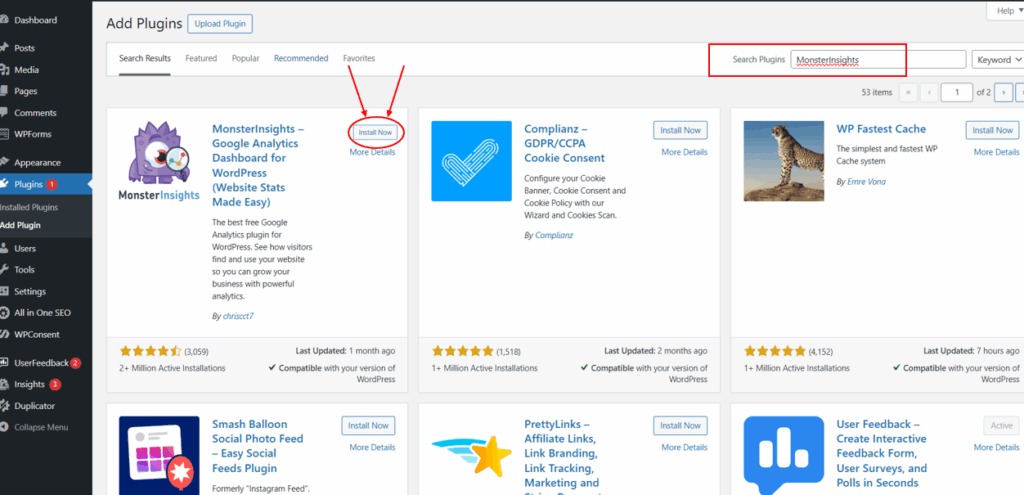
2. Add the MonsterInsights Plugin
Then on the search menu bar type MonsterInsights and once you find it press the Install now button. Then press Active button to start using the plugin to connect to Google Analytics.
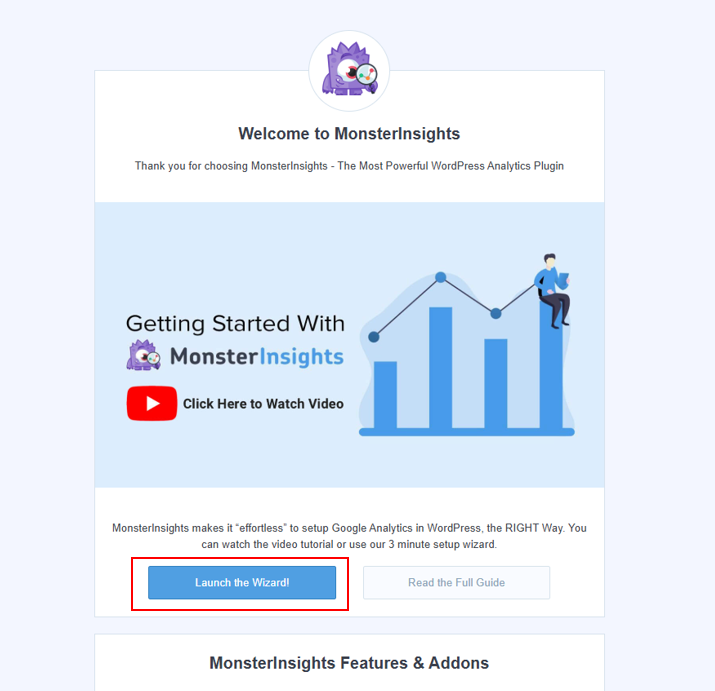
After Activating it, it will open a page where you can watch a video to getting started. It’s a brief important introduction of MonsterInsights. For continuing, you have to press the Launch the Wizard button.
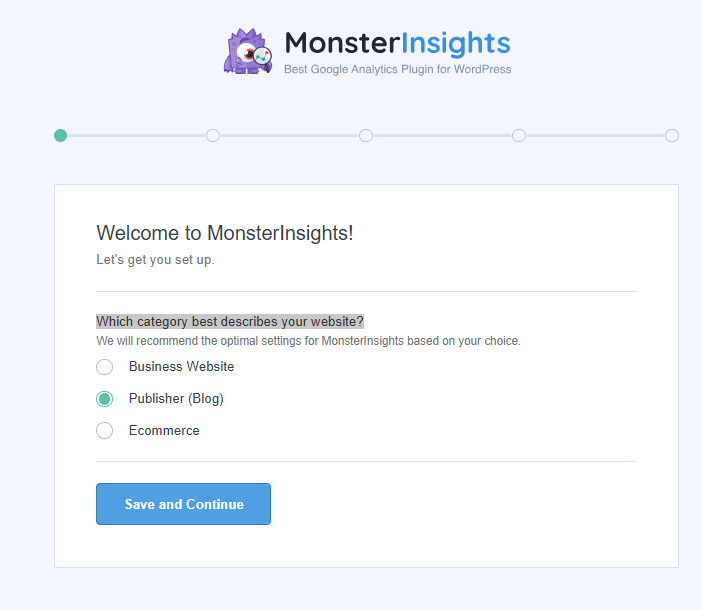
3. Select the best category that describes your website
Then you have to decide between three categories that best describe your website. For this exercise I will choose Publisher. After selecting, continue and press the button Save and Continue.
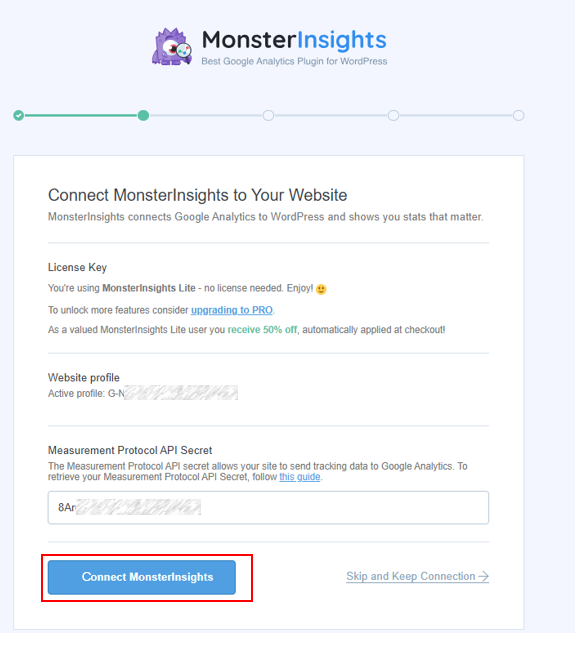
4. Connect MonsterInsights to Your Website
A new window will show up. This indicates your you won’t need a license key because you are using the lite version, which is free. However, if you need the PRO version, you can upgrade it by a price. You can also find your profile code that start with a G-. This code is important because is the one that will connect and will be the key for the Google Analytics connection. After reading this window information, please press Connect to MonsterInsights to continue.
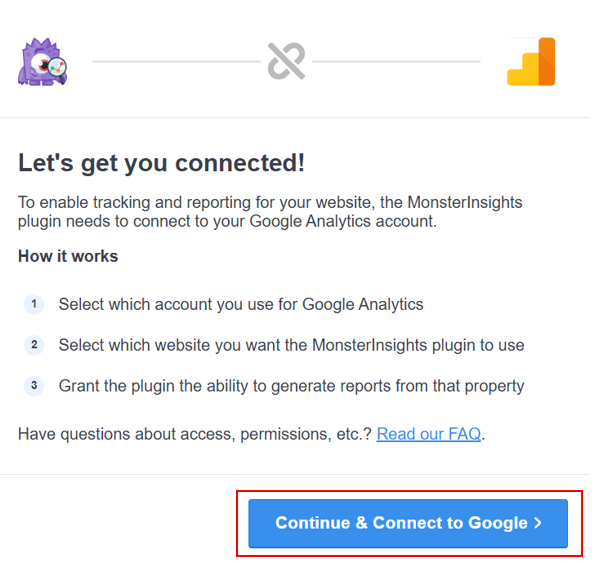
Then this will lead to another windows where it will tell you the next steps. For continue you need to press the Continue and Connect to Google button.
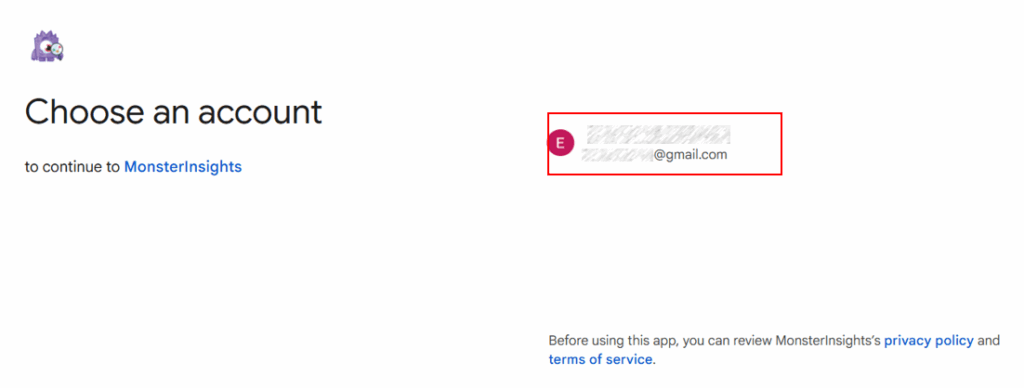
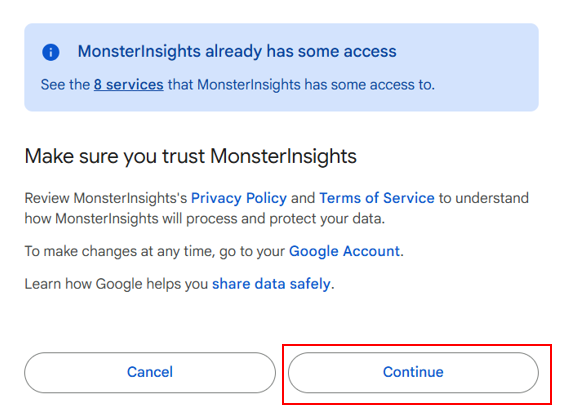
As mentioned before, you will need a Google Analytics account. If you don’t have it, please create it. If you do, please select that account and login. After this, you’ll need to review Privacy Policy and Terms of Service to understand how MonsterInsights will process and protect your data and if you agree please press the continue button.
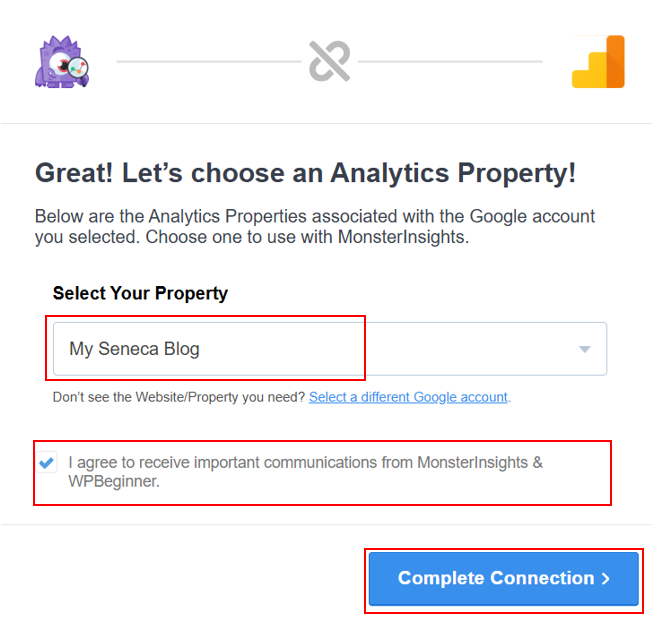
Then you need to choose your analytic property. You will need to type the name of your property and check the box if you agree to receive important communications, if you don’t, you don’t need to check it. Then press complete connection to continue.
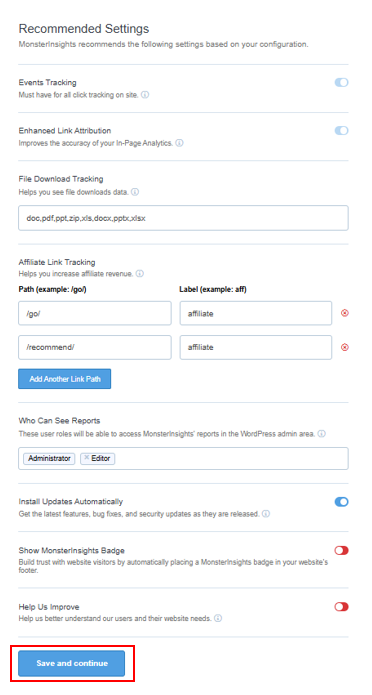
Then you will need to check the recommended settings and adjust according to your preferences and press Save and Continue button. Please consider there is Show MonsterInsights Badge that is an option that will add at the end plugin logo, you can decide if you want to include it or not.
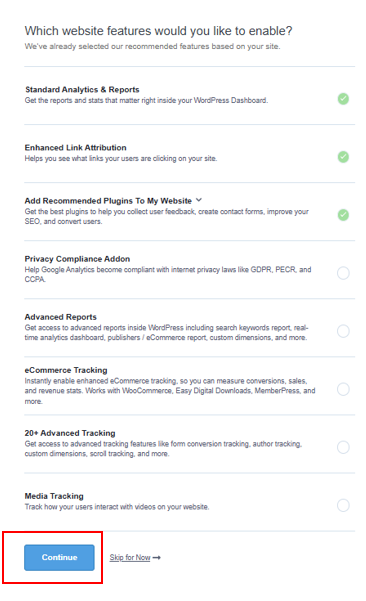
Then you would need to confirm the website features you would you like to enable, and press continue. Or if you prefer you can skip for now.
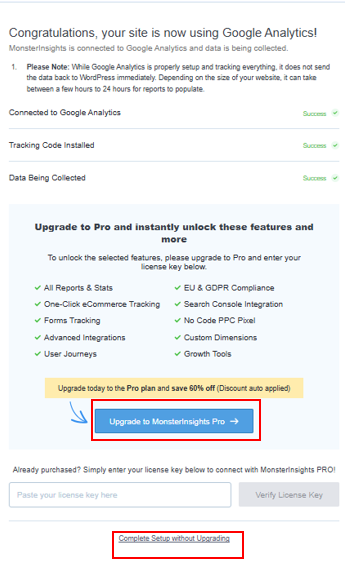
As a last step it will ask you if you want to upgrade to the PRO version. If you do you can press the button upgrade, but if you don’t just press the Complete setup without upgrading.
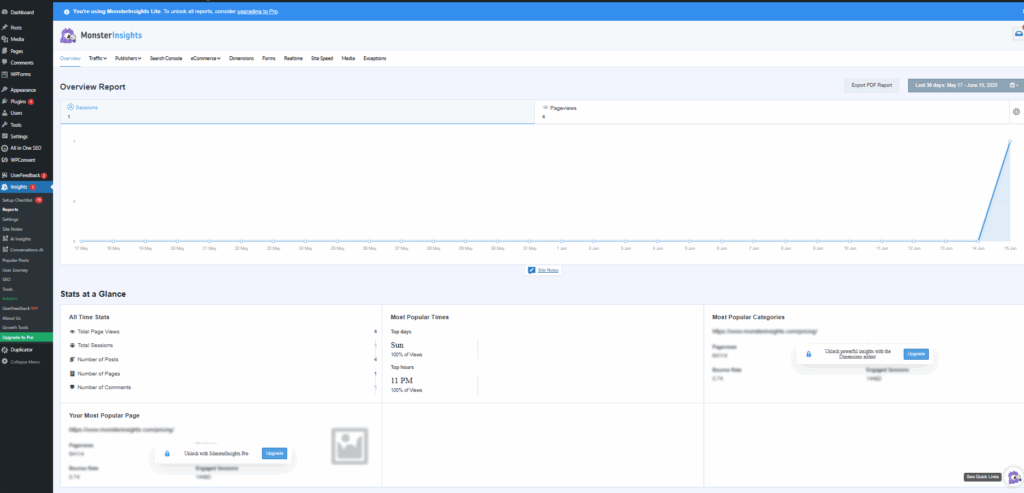
Finally, once connected in your WordPress you will be able to see a dashboard like this:
As mentioned earlier, the G- code is the key that allows WordPress connects with Google Analytics. When we used MonsterInsight it connected to Google Analytics and automatically added the tracking code to the website, so there is no need to do it manually or insert it.
Conclusion
Understanding the basic for customizing WordPress is not as hard as it seems. With just a few steps, you can change the theme, uses HTML to structure your content and apply CSS to customize the colours and style. Additionally, you can set up Google Analytics to track important KPIs. All this can help your website to look better and perform more successfully.
Vestibulum sem enim, pharetra nec suscipit sed, pellentesque nec odio. Sed non nulla eget velit vestibulum hendrerit eget et dolor. Fusce dignissim arcu velit, eget pharetra velit ultrices ac.
Nunc sollicitudin tincidunt mauris sit amet volutpat. Etiam et imperdiet lacus, quis semper nibh. Proin non iaculis mi, a congue enim. Nam blandit nisl non ante aliquet malesuada. Nulla eget sapien ornare, accumsan tortor ut, rhoncus leo. Duis elementum metus non est congue, ac placerat mi laoreet.